For assignment 5 I made another photo for the series. This was on suggestion of my tutor and also even before that I’d decided that the angle of view for the original photo of my bathroom was just too odd. Spatially the bath of the original photo sat lopsided in the frame and the focal length (35mm) gave too wide a look to the subject. This might of served in a another context but I figured that another photo might work better.
Whilst finding it difficult to engage enthusiasm for taking the photo again because the subject matter was not thrilling! I soon got into it when I remembered that actually it is part of a series and so keeping me focused in the perspective that I am shooting in.
I used flash (bounced off of the ceiling) with a grid to control excess spillage of light in order to enhance the items of the bath and the area of the bath. The original photos was quite dark. Another reason to re-do it. The visual perspective of seeing more of the objects in the bathroom also fits in better overall with the series as the rest show a wider angle of view into different parts of the house.
Original photo for assignment 5
A few technical points
This image was taken with an 80mm lens as opposed to the majority that were shot with 35mm.
Getting the photo right was difficult because of the limited opening into the space through the door and the space at the head of the bath. Therefore I had to make a technical compromise by losing a little bit of the bath at one end.
“Many thanks for the final assignment and well done on completing the course. I hope you have enjoyed it and it has been a pleasure to see your photography progress over the past few months.”
Thanks, I appreciate your input during the last year, has been very clear and helpful
“In addition, prints were sent by post.”
“I understand that you are submitting for assignment so do contact OCA Head Office for details of how send in your work and the requirements.”
“When you receive the feedback from assessment, use the assessor comments to move your work forward.”
“Wishing you every success with your future photography.”
Feedback on assignment
Demonstration of technical and Visual Skills, Quality of Outcome, Demonstration of Creativity
“With this set of images you have again produced a distinct series of work. The influence of Sophie Calle is evident but you are showing that your visual style is emerging. The next courses at Level 1 will allow you to try different approaches and working methods, some of which you will enjoy and others may be more challenging!”
Student name
Steven Young
Student number
513886
Course/Unit
Expressing Your Vision
Assignment number
5
Type of tutorial
Written / Audio-Visual
Written
“Technically some of the flat lays don’t seem to be completely flat and shot form a slight angle – this may be something to look at. The low angle view on the living room space works particularly well with the shaft of light. In comparison the bathroom shot is more awkward – which you write about in your review. The 35mm lens here may be simply too wide for such an enclosed space.”
I’m aware of this. I struggled a bit with the angle of view. I needed a lot of height to take the images from and to avoid putting the legs of the tripod in the frame I had to do some strange maneuverers.
“The strength of the assignment is the consistency in style and approach. This is a working method that will stand you in good stead as you progress to future courses.”
“The print quality and presentation is good. The white border sets the images on the page and is an appropriate size. Do take care with the use of key lines as sometimes prints do not need them.”
Coursework
Demonstration of technical and Visual Skills, Demonstration of Creativity
“The coursework exercises are completed with good detail. The choice of Serrano is interesting and challenging – at the time the image created enormous controversy. Do you think the art world is shying away from such subjects now? Has the shock value of art pieces been lost in the online digital age?”
I think that the art world has lost something of that ‘punctum’ and strength of expression that we were seeing at that stage. Responses to definite issues that are unambiguous and direct are difficult to come by. I find that photography has more of a chance of being an effective voice but there is something lacking. Maybe its the pressure to conform or to get work recognised it has to be of a certain correctness.
“It was good to read your post on Bill Viola and David LaChapelle. I too saw the Viola exhibition at the National Gallery and the pieces of work have stayed with me and he is an artist I often return to time and again.”
This was one of the first pieces of visual art that really made me stop and think. I found it really strong at the time. It was like I’d discovered something looking at those faces and emotions, about myself.
“For reference – can your correct your post on Sindy Sherman to Cindy Sherman. At times there are some small typos in your work and if you have sometime that can look for these as you progress through the courses this would be good.”
“We discussed on the phone, having an ongoing reference post where you summarise sources as you use them. This is much easier to do in real time – so if an approach to adopt on your next course.”
It is good to see updated comments and reflection and reading how your response to Calle’s work has changed over time. I think many students have similar responses to photographers as they pursue their studies.”
Yes its strange how that can change. I’ve used her at least twice as a basis for assignments and yet initially I had a sense of aversion to her photos. It helps to look more closely at the artist and understand where they are coming from. In the end I am a bit of fan of Calle.
“This post also demonstrates that you are engaging with the theoretical aspect of the course. This engagement is becoming a dialogue between yourself and the various sources and is again something to continue.”
“Many thanks for the reference to the Bajac interview – I hadn’t read it before and it has plenty of food for thought.”
Yes I found it really useful for understanding a bit more the current photography world
Suggested reading/viewing
Context
“For complete contrast to the work you have produced and that of Sophie Calle. Do look at Nick Waplington – The Living Room and Richard Billingham – Ray’s A Laugh. Both are documentary books which feature domestic spaces. The images are much more cluttered and seemingly random in approach.”
Pointers for the next assignment /• “Ensure all prints are labelled with name, student number, course and assignment for assessment.”
2.Brief:
To produce 10 images each giving a different view of the same subject. Pay attention to the order of the sequence and how that unfolds.
3.First thoughts and ideas
I take the word ‘view’ from the initial introduction to the the assignment to mean point of view as in my particular take or way of showing something (my perspective) or viewing point in terms of the physical placement of the camera in time and space. I have chosen the theme ‘house’. This could mean the physical location whereby one washes, dresses eats and sleeps, or it could be something more symbolic such as a psychological base of security and a ‘safe place’ from the world. It could be portrayed in many ways. To this end I need to give some thought to how I will present the theme.
For me personally the house is an important place, but not the only space that I occupy in the world. However psychologically it has importance as it represents the base from which my other activities in life are launched from as well as being the centre where I perform many of life’s daily routine activities.
Sophie Calle’s work [1]Hotel, room 47 (1981) has been the vision underlying this assignment of which I say more about in the research section. The idea is to portray something of my own identity through showing things that I do and the places that I do them.
4.’What is it about’? (300 words)
I have not chosen a complex theme for the ultimate assignment. In this sequence of 10 photos, you’ll see where I live and the components of that life that make up a large part of my yearly routine as a photography student and also the other things that I do. Some of these activities are perfunctory tasks and they are necessary to daily existence. I show the photos in the order that I typically do these particular things in any one day. I show both the things that I use, which are part of the ‘living’ process of what I do and I show the places where I do them. In a sense that is it! Within that I have attempted to show the context of my life (not all but a lot) and use the occasion of the assignment to practice elements of photography such as working with light, composition and creating a set of ‘visual ideas’ in the form of photos. I have tried to use the natural light in the different parts of the house to show the mood of that space.
A large part of my weekly activity involves the use of these items and that made me reflect on appendages that we have in our lives that maybe we take for granted. Things that actually make up an essential part of our life activities that perhaps we never give a second thought to. Photographing them in this way, brings out the essential nature of the item to the task, I believe.
Having said that the theme is not a complicated one. From the inspiration of Sophie Calle, there is a context of identity happening. This I would say is most strongly present in the “external context” Barett (2010) in that the ‘home’ provides the container for the images and is the setting for the images. Whilst my own identity is not exclusively tied up with the items or the places in the photos, there is a strong proportion of it in these things and activities.
5.The photos
12345678910
6.Contact sheets for assignment 5
references
Calle S. Suite Ventiene (original title: L’Hotel, Chambre 47)Hotel room, 47 (1981).
After tutor feedback I was advised to correct the colour balance and attempt to sort out one of the images of the series of eight that had noise problems. The final photo has major noise issues which I have also re-worked. This was due to a dark studio mixed with high ISO at 400. In addition I placed the photos into a border which they did not have previously.
I’ve not been at all accustomed to reworking assignment during my course as this is the first time that it was strongly suggested by my tutor. However I found it a really fruitful exercise to go back over work and ‘rework’ it in order to improve it. I think here I have learned a lesson and its no bad thing at all. The fact is I am much happier with the work having re-worked it. Therefore maybe its something about time. Letting some time pass and then revisiting a series seems to yield new results. As it happens the re-working was not major. It was simply a question of finding a formula to eradicate a colour cast of green on almost all of the photos. I doesn’t surprise me that this happened as I was working in a studio photographing dark tones and using one lamp that had a green shade. The issue was that I could not see it on the screen, or, my eye did not detect it well enough. When I got the prints I did see a cast on one of the photos and in fact wrote “green cast” on the back of the photo. My tutor obviously saw better than I did as it was picked up on several. So without further ado and in preparation for sending off for final assessment, I got down to it! I am as I write finishing off assignment 5 today.
Below I’ll give a description of what I did step by step in order to make the adjustments.
Essentially I decided to re-work all of the photos and I am pleased that I did as in the end they all had some degree of green cast on them.
The process I followed is as follows:
a) Light room adjustment——-Temp + 5-7 to red and Tint +10-17. There were minor variations on all photos but this was the average. b) I passed the photos to Photoshop and made the following adjustments: Colour balance layer (mid-tones) +7 to Red and -5 to Magenta. Again there were slight variations.
The ultimate photo had a problem of noise so I followed the following procedure to correct it.
a) Photoshop———>duplicate background>filters, reduce noise>Overall noise reduction setting>Bring strength up to about 15>Presence to about 10>Reduce colour noise to about 12>sharpen detail to 3-6>open surface blur>reduce radius to 15 or so>threshold to about 30>blur radius to 12 or so>opacity to 75%.
I am overall a lot happier with the sequence. The colours seem stronger and more balanced and the sequence has a noticeably less ‘cool’ feel about it. However, with the last photo I am somewhat disappointed with the outcome. I recovered it as far as I can, but I feel that essentially there was too much darkness to use an ISO of 400 although I thought I would have got away with it. I had used a different light set up as an experiment on the last photo to give a slightly different emphasis. I realise now in retrospect that this did not work quite as I wanted it to. The light is obviously not the same as the other frames and this somewhat throws the sequence out at the end.
Overall Comments “Many thanks for your fourth assignment and I understand that you are making good progress towards assignment 5. Do get in touch with OCA Head Office to find out about formal assessment as there are set dates for when you can send off your work for assessment.”
“Now is also a good time to go back over all the work you have done so far and check that all is in place. Do feel free to add to any of your work so far. You may find that you are able to add more reflection to your work now that you have progressed so far through the course. Do also ensure that all your research is documented, as this is a vital component of the course.”
Yes I plan to review the whole of the course work as things have moved on and probably I can add some reflection to the earlier part of the course.
Feedback on assignment “Demonstration of technical and Visual Skills, Quality of Outcome, Demonstration of Creativity The assignment reflects that you have taken time to research, plan and reflect on your work. I hope that you have found the process enjoyable! The annotated contact sheets are useful to see how you have viewed your work, and I would recommend that you continue with this.”
“It is also good to read that you have responded to Clive’s comments from the forum. This use of the forums is a really good way to expand and develop ideas. You could also include screen shots of the posts to see how you taken the advice on board.”
Clive in fact made other suggestions but I did not think that I needed to follow them all through. It seemed a fair judgment to make the brightness and exposure adjustments alone. As I was not intending to portray a necessarily realistic look, I didn’t think that it was appropriate to follow through all that he had observed. His feedback however was useful. Clive’s comments are at the bottom of tutor feedback here.
“You have produced a series of images where a narrative is shown. The images have been staged and you have taken care over the construction of your scene. The series does flow from image to image and the link can be made between the two characters despite them not being shown together at any point.”
“You are quite right to assert that with pre-visualization you have to open to your ideas changing/developing. However what pre-visualization can give is a valuable framework (both technical and artistic) for you to start from.”
Yes I wholly agree. In a sense it comes quite natural to pre-visualise, at least for me. However, I wonder if this skill can’t be developed and strengthened? I suspect that through learning logs and the like one is putting into practice a certain degree of pre-visualising all of the time. However, I quite literally sit down and try to see the scene complete within my mind and the sort of lighting that I wish to produce. This becomes more real, a bit like vocalizing one’s thoughts, through actually building the scene and or taking the photos. I think that there is a pre-visualise and a post observing phase whereby you make the necessary adjustments to the ideas etc.
“The images are competently taken and composed. However there are some issues with the prints. I have enclosed a guidance sheet which outlines the main points on printing and I will highlight the key issues here.”
“First of all do include a white border for handling the image. The last image of the set in the print is showing noise – was this image shot at a very high ISO? Or it could be over sharpened.”
Yes the ISO range was too high for the image. And then it was over sharpened giving it this look. I’ll need to go back and work on it again. “Some of the images have a colour cast – this could be caused by the standard lamp in some of the shots. Do have a look at the colour balance in the images. Whilst you may want a colour cast for mood effect as in the picture frame in the first image. The subject is correctly lit.”
The colour caste showed up more in the prints than on the screen. And I was aware of it when I sent the prints off. It was not an intended part of the image, no.
“The standard lamp becomes the link in your series as it the use of this, and your lighting that gives the images a sense of consistency in order for the narrative to be explained.”
“In your reflection, try reworking this. Be more specific about what you say, rather than general comments. For example when talk about experimenting with light, what exactly did you do? The light you have created is moody, dark and atmospheric. Be precise in your comments.” Coursework Demonstration of technical and Visual Skills, Demonstration of Creativity
“The coursework has been completed. You are documenting the exercises well. The next stage is to add more self-reflection on how you think the exercises are developing your photography – both in terms of technical and artistic skill.”
Okay Research “Context, reflective thinking, critical thinking, analysis You have included research for this assignment. The research post does also contain information about the images produced. You may wish to break down your posts further and cover one topic per post.”
“You can also evaluate your images by referring to your research. How did Mann, Crewdson and Lekic influence your images (if at all?) It is good to reflect on how your work has been influenced by the research that you have undertaken.You are continuing to reference your work well – do keep doing this.”
Learning Log “Context, reflective thinking, critical thinking, analysis I think the new approach of recording your learning log will work better. However it may be confusing if you send your work for assessment so I would ensure that you write a short note that accompanies your work to explain how the recording on the log has changed.”
“It is good to see that you are including quotes by other photographers. The next stage is to add some commentary to them. Do you agree with the sentiment expressed? If so, why? If not, why? It may be that you have an image that you can use to respond to the quote. It may by the photographer you are quoting or it may be your own.”
Suggested reading/viewing Context
Although not strictly seen as photography as it more classed as video art, do look at the work of Bill Viola. The use of slow motion expressions in pieces such as Emotions are well worth looking at – do look at the video pieces rather than stills to properly see the work.
Also look at the work of Cindy Sherman, particularly the Film Stills series where she photographs herself. This is some of her earliest work and you can see how much costume, setting and staging can be used to change the appearance of the same person. There are numerous video sources available where she talks about this work.
Pointers for the next assignment / assessment Reflect and evaluate your research in terms of how it may have influenced your photographs Rework your evaluation and make specific rather than general comments.
*Clive’s comments on my assignment
“You have been adventurous and that’s a good thing, well done on your ambition and what you’ve achieved for your first time in a studio setting.
Taking the first image classically it’s under exposed. Here I’ve normalised it by applying the Brightness and contrast filter in Photoshop on auto and then the Shadows/Highlights control at default settings.”
When I looked at the normalised version it was not at all the effect that I wanted to produce whilst I could appreciate that it was underexposed. In fact, I corrected all the photos for exposure in the end.
“Now the most obvious thing which is classically wrong is that the standard lamp isn’t bright enough.”
“Think about how the light setup could be explained. The man is sitting in a living room lit by a standard lamp reading his bad news. So where is the light illuminating him strongly on the left coming from? The door is a jar and light is spilling in from the hallway. But it wouldn’t be so bright as to cast a shadow inside the lampshade.”
“If the lighting balance and exposure was realistic the inside of the lamp would be burned out like this…”
Yes of course he has a point, but I was not aiming for a necessarily realistic look within the images. Therefore I was not too concerned about another light source unjustified showing up in the photo.
“The table lamp would illuminate the brightly coloured flowers quite strongly now but his arm would be back-lit so just rim lit to the elbow.
Now one can start to rebalance using soft masking to begin to re-establish the intended mood. An image can only be fine tuned as low or high key by exposure to be convincing. One can only vary the exposure by about a third of a stop over or under the normal exposure, any more than that and it’s simply over or under exposed.
One needs to create the effect with the balance direction and control of the lighting. here I’ve used soft masking to fine tune individual elements. The brightness of the drawer front, separate from the flowers separate from the left hand side of the man separate from the inside of his forearm on the right.
Now the lighting makes classical sense. The light is coming from the standard lamp and it’s light creeping in from the hallway which is giving us the right amount of illumination we need to see the man’s expression while not appearing unnatural.
Try it with some of the others as an exercise.”
In the end I took a simpler route. I explain this in the analysis section in the log notes, however this does not invalidate Clive’s feedback, and it was useful to get it.
2.Brief and initial thoughts
The initial part of every new assignment is the most difficult and the most rewarding for me. I like the somewhat challenging aspect of having to bring into being and clarify a concept, then transform it into a coherent idea and then some work in the form of images. This has been especially the case for this assignment. I knew straight off that I wanted to deepen my knowledge of studio work so this is why I have chosen this as my context for the assignment.
3.Introduction to assignment and the images
I have probably spent more hours researching and testing for this assignment than any other of the two years studying with OCA.
The chosen theme for the assignment was studio lighting. I chose this theme because I’ve wanted for a long time to deepen my knowledge and experience in this arena of photography. The project has given me a good chance and opportunity to do just that. The focus for the assignment has unfolded from initial research of a couple of photographers to becoming a staged photo sequence using the light to create mood, atmosphere and emotion. I have found this process very rewarding. In the course of the development of research, especially looking at lighting by Child & Galer (1999) and Prakel (2007) I have learned a lot about studio scenarios and set up. In addition I took a long hard re-examination of composition skills.
The photos then are eight in number and follow a sequential order that I think will be obvious.
The starting point for the assignment was the exploration of the work by Andrija Lekic (in the OCA student manual in the ‘Language of light section’) and Gregory Crewdson. Especially his photo named Ophelia,(2001). What attracted me about both of these photos was the essential nature of light appearing in a predominance of dark tones. More can be seen about this in the research section.
Above Lekic, A / Below Crewdson G. Ophelia (2001)
The spots of light in Andrija’s photo with window light projecting into space was part of what triggered my thinking to make a set of images based in the studio identifying areas of light within the frame that is dominated by darkness or dark tones. A low-key dominance…very low key.
Below are the images taken for the assignment in sequence of 1-8. They should be viewed in that order as that behave as a sequence based around a story. The story itself, a simple theme should be evident. Each photo uses a scene acted out, by a model. All lighting and positioning was pre-meditated.
Slide show of assignment 4 sequence
This slideshow requires JavaScript.
stills beneath in grid
(first set of images underexposed)
1st image
2nd image
3rd image
4th image
5th Image
6th image
7th image
8th image
NOTE * Second set of images – brightness and exposure adjusted
After feedback on the critique forum from Clive I followed his recommendation to up the exposure and brightness. I could have played more with soft masks etc, but I did not want to overly edit the images. It is a definite improvement overall for the images and they feel more coherent. However sometimes the light appears too hard for my liking and this is partly down to not having a large enough light source and diffuser that would have softened the light more.
4.’Thinking in light’
In order to take this assignment forward I found that I needed to practice quite a bit of pre-visualising. In fact, this is a skill which I feel I am starting to develop. It is also I believe essential to the process of forming a set of photos and as important, if not more so than the idea that underlies it.
So in doing a substantial amount of pre-visualising I learned a few things. 1. That the process of doing this is likely to lead to a change from the original idea (it tends to evolve) and 2. That needs to be accepted and I believe this is part of the imaginative process that forms the base structure for creativity. If you can’t imagine it, how can you create it? This in itself has been a very useful process. However, the imagining and pre-visualising is not simply a visual process, it is mixed in with concepts and emotions of what one wants to say or transmit. In the end I had to get into the studio whereby I now have a dedicated place and set it out and start to imaging the use of the space. I brought to mind aspects such as composition, planes, triangles and lines, curves etc. The most difficult part was to pre-visualise light.
5.How I worked with light
I more or less knew what I wanted to do with the photos based on some of what I had done earlier (see link to assignment 4-foundation course:https://truevisionphotography.wordpress.com/2016/02/24/assignment-4-experimentations-in-still-life/) I used that as a basis for creating these images. On the whole I worked it out photo by photo whilst at the same time working to maintain a linking sense of the photos. I have done this in a number of ways. 1. I have used similar light to express the feeling of the scenes. 2. The images are a sequence unfolding as a story. 3. I have used only two characters that portray the story to keep a simple narrative.
More specifically with the light I wanted to create a mood of sadness, of loss and imminent separation. Then later in the sequence the idea was to show various stages of resignation. That space one falls into when you know that you can do nothing to change a difficult situation. So my experiments with light were based around trying to find the right pitch of light. I wanted soft light not hard light and I wanted the dark background so that I could strongly highlight the aspects within the frame and tell the story. My main light source was a 200w LED light head used on a low setting, around 3. I had an additional small LED lamp that I used in some of the photos as a second light source to illuminate some of the objects that did not fall into the main light source spectrum, such as the picture frame turned around in the second photos of the series. I experimented with positioning of the light to see what was most revealing of the emotion or the posture of the person. It seemed that not having the person fully lit in any one scene was more conducive to the type of mood that I wanted to portray. This is why in most of the photos you see that the characters are not in full frontal lighting. The exception is the girl crying in the portrait image full face. In this I wanted to see her face and emphasis the distress. The lighting mainly falls from the left side of most of the frames and in some cases I had it angled 45 degrees down to create a different mood such as picture 6 and 7. Picture 3 of the man walking out of the door, was done using the light from the right side of the door frame and then a reflector behind throwing minimal light to the back of the character. The aim was to give a sense of someone leaving at night. The light source could be the headlights of a car for example. In the final photos (the one that I aim least satisfied with) I had a different idea to illuminate more of the scene to bring a kind of closure to what had been happening. For this I reflected the light directly off of the white ceiling. If I were to re-shoot this I would do it another way and probably photograph from another angle, closer more intimate and with less background. The light would match the effect of the rest of the photos. The idea had been to ‘lift up’ somewhat the mood. Here she is seen burning the letter of departure and this suggestions maybe a certain acceptance. So I wanted the light to be less sad and a bit more vibrant.
6. Contact sheets
7.Conclusion of how I met the criteria for creativity
Imagination – I conceptualised the photo sequence largely from a my own imagination, in that the scene came through reflecting on a life scenario that everyone can connect with. I feel that I have exercised well my imagination here in that I created something with a story and did not simply try to photography an object in a slightly clinical fashion. I feel that this area is developing in my photography practice. My imagination was allowed to ‘follow its nose’ with this project and I allowed myself to explore lighting effects fairly successfully I feel.
Experimentation – I believe that I experimented well within the bounds of my equipment. I used the light to create a certain effect which I believe I achieved. I pre-visualised the images and the light before taking the shots. In particular I experimented with the different way light manifests: Intensity, direction, colour etc. I experimented with light position, intensity and direction to try and emphasis emotions such as grief, sadness, loss and the sense of resignation that comes with loss of control of something loved.
Invention – In line with what I wanted to communicate I feel that my inventiveness came out in this set of pictures. I had to invent a story coupled with directing the postures and expressions of my models as well as the sets that I put together. I would say that I did well in this area. I could of course invented more and perhaps been more nuanced in my approach. As it is, I aimed to tread a middle way between too explicit and too implicit. I did show the characters together at any point, and this was intentional to give the space for the viewer to do a bit of guess-work. Of course, it was not so difficult to work out what was going on. My invention of the set, I thought was adequate with the resources I had and the lighting provided a good feel to the photos.
The decisive moment – assignment 3 by Steve Young EYV
List of contents:
Tutor feedback
Brief
Introduction (printed and sent to tutor)
The selected photos x 7
Initial stepping into project phase
Pre-selects and test images
Contact sheets
Where the assignment ‘went next’
NB. Analysis of images and SELF evaluation found at bottom of log note page: http://wp.me/p7xP3C-hX
Tutor feedback assignment 3
Samples pages from the notebook and prints were sent via post.
“You seem to be putting more and more on your blog over time and I wonder if you might find it better to type up all your notes onto the blog. You can see use a notebook to sketch (and then upload these pages as scans or images). The advantage of having your notes online is that you can paste in the notes, which makes it much easier to follow through any online links.”
“It is also a little hard to read some of the pages as the copies are blurred.”
Yes I’ve struggled to adequately get my notes into a format that is readable on-line.
Feedback on assignment
Demonstration of technical and Visual Skills, Quality of Outcome, Demonstration of Creativity. “For the assignment you have completed the series of images. From the post on the blog it is clear that you have undertaken some background reading into Cartier-Bresson. The research is good, with appropriate reference to John Szarkowski. You have looked at a range of photographers and made reference to how they have used juxtaposition. Do carry on making links between your posts (as you have linked the research post in the assignment 3 main post).” “The set of images have an overriding theme in that they have been shot in similar locations. For me the strongest image is Image 4; which stands out as intriguing with the mystery person under the umbrella. The other person is just kept within the frame (another fraction of a second and they would have clipped the edge as they moved down the stairs).”
“You have avoided general crowded street views, which is what people often shoot when using a wide lens such as 28mm. Instead you have succeeded in isolating the details, which has produced a stronger set of images. The use of 28mm may be a little too wide; many street photographers’ prefer a 35mm, which has less of a problem with distorting verticals when shooting close and not amplifying depth in perspective.”
Yes this was a creative and intentional decision not to be too general with the photography but instead draw the attention to particular details.
“In your review against the assessment criteria, the context section is rather general. Think here specifically about the sources that you read. Was there one thing that you gained from your research? Was there anything that you read/looked at that you think you may have rebelled against? Sometimes we can take one image or passage of reading as a key pivot point in producing work.”
More has been added to my learning log about the above comment
“Do keep including your contact sheets, it is interesting to see how you have approached the images. For example for image 4 you can see from the sequence how you could almost see the image coming from the initial shot through to the final shot. The huge advantage of digital is that we can keep shooting and not worry about wasting film. The huge disadvantage is that editing becomes a much lengthier process. How did you find the editing process for this assignment? Did the chosen images stand out immediately?”
Coursework
Demonstration of technical and Visual Skills, Demonstration of Creativity “You are completing the exercises/projects and uploading these to the blog. Do keep working through the exercises etc and adding your notes to the blog. It is good to note if you struggle at any point with any aspect.” Research
Context, reflective thinking, critical thinking, analysis “Do remember to keep updating your research section on the blog. You have undertaken good research for planning for the assignment. I have commented in the feedback on assignment section about evaluating your research – think about specifics here rather than being general.”
“To push yourself further I would recommend including some research/reflection posts that are not directly related to the course. This could be more on your thoughts on photography and/or on your own photography. You may respond to something that you read or hear about photography or reference gallery visits that you may do. This shows that you having a general awareness of photography that goes beyond the course. This type of approach will stand you in good stead as you progress through the following courses.”
Learning Log
Context, reflective thinking, critical thinking, analysis “The log is easy to navigate and do keep it up to date – particularly with regard to research and reflection. I do recommend that you do some general self-reflection on photography. It can be issues in the news and does not have to be related to any particular aspect of the course.”
Suggested reading/viewing
Context
For more contemporary street photography (and for work in colour) do look at the following photographers:
Nick Turpin – British photographer
Bruce Barbey – Magnum photographer
Raghubir Singh – Indian photographer
“Turpin and Barbey are very adept at isolating quiet moments on the street; they are both excellent at picking out small details as can be seen in your images. Singh produced a wonderful series of images linked by using cars as a theme. If you enjoy street photography – having a theme can allow you to link images from diverse locations to form a series. It could be shadows, signs, street furniture – someone I know has done shopping trolleys! The chosen subject becomes a motif in the images and is a good working brief for a long-term project.”
“Pointers for the next assignment / assessment In your evaluation of the assignment, be more specific. Give examples to really refine what you have saying – this can refer to particular images or reading sources. Write some blog posts, which reflect on your views on photography.”
1.Brief
Submit a set of between six and eight high-quality photographic prints on the theme of the ‘decisive moment’. Street photography is the traditional subject of the decisive moment, but it doesn’t have to be. Landscape may also have a decisive moment of weather, season or time of day. A building may have a decisive moment when human activity and light combine to present a ‘peak’ visual moment.
You may choose to create imagery that supports the tradition of the ‘decisive moment’, or you may choose to question or invert the concept. Your aim isn’t to tell a story, but in order to work naturally as a series there should be a linking theme, whether it’s a location, an event or a particular period of time.
2.Introduction (printed and sent to tutor)
In this assignment I have presented 7 photos based on the theme of the ‘decisive moment‘ and within the overall theme have used the idea of juxtaposition and ambiguity as the motif for the images.
The images are of the spontaneous variety, of the nature and genre of what we call ‘street photography’. In the research section I discuss the difference between documentary and ‘artistic photography’. I have also placed an analysis of my photos there
Research for the assignment
In the research section of the blog you can see the pre-work done prior to and during the period of shooting the photos which took place over a number of weeks. Below is the link to the research page:
My process in the working with the imagery has been somewhat laboured. I have given quite a bit of prior thought to how I wanted to work; one lens, (28mm) shooting scenes on the street that represent or depict juxtaposition and or present a question (what’s happening?) within the decisive moment. I have tried to work closer in when the image involved people. I spent a lot of time wandering around and looking. I tried to pre-visualise the image and sometimes the decision to take a photo was for the setting and other times for the person or people. As I was constantly seeking out and wanting to be true to the theme of juxtaposition I had to be careful not to get involve in other potentially interesting shots. So I was quite disciplined and selective most of the time. However in some images the juxtaposition comes through more obviously than others and at other times, ambiguity.
The shots were done over the course of a number of sessions. Each session that I did was using a similar routine. Go out, take a good look around, be attentive, aware of situations, faces, people and their gestures and trying to imagine the value of the photo in print. How would I view this in print? I would often ask myself. One thing that I have learned is that this genre of photography is different from many other forms such as landscape, tableaux, portraiture or documentary to name a few. In general waiting for a decisive moment can be a bit painful and laboured. I have learned patience. Of the many photos I shot, each time I selected I scrutinised them each time more closely, thus sharpening a bit more my analytical skills. In some cases I reviewed images up to 30 times.
3.The selected photos x7
Image 1:
This photo relates to the concept of the ‘decisive moment’ for me because of how it brings together two periods of time in the form of the buildings. It shows two point of history, decay and ‘rebirth’. The man on the bike is a bridge between the two times, as he is not fully in the present (a gypsy looking for scrap metal) and not in the past as for the time with ruin represents.
Image 1
Image 2:
A nun with her back to the camera looking at a poster that represents something that she is not a part of. The worldliness of the advertising and the values of the nun do not match. They do not belong on the same plane. The gesture of the nun is hidden. We don’t know her exact response. This fits into the theme of ‘decisive moment’ from the point of view of Juxtaposing two value systems that are mutually exclusive.
Image 2
Image 3:
A man walks by a beggar, he has of pet chimpanzee on his bike. A social juxtaposition was aimed at here. One man with one arm and another with time to be concerned about things that the other cannot really contemplate. The ‘decisive moment’ in this image comes in here. Where an event has coincided to reveal a certain reality. The man’s gaze with the bike decisively looks away from the beggar. This is as if to say I am concerned about my part, the fun part but not yours.
Image 3
Image 4:
Someone disappears into a subway station with an umbrella. The decisive moment here was more of an aesthetic one; a coincidence of forms and shapes that gave rise to visual interest.
Image 4
Image 5
A priest deals his blessings. I like this image a lot and generally shooting body parts in situations for me leaves questions unanswered. The images that I have seen that leave questions for me are the most interesting and stimulating. The juxtaposition here is not so strong. However, there is a curious tie in with the other photos in the set, as I have used people in situations that are not altogether clear with some sense of ambiguity.
Image 5
Image 6
A man with wet trouser legs inside. Why? This again raises a question rather than juxtaposing. Although one might find a juxtaposition between a man with wet trousers and that fact that it is a grown man. One does not know why, but the mind makes conclusions.
Image 6
Image 7
A woman sits at a bar. The Juxtaposition here is not so strong but again there is an element of ambiguous behaviour. The expression, the clock and the alcohol all serve as part of the image.
Image 7
4.Initial stepping into the project phase.
The first set of images below are the ones I took on the first session of shooting and thereby I have explored a number of different ways to express or show the photos. They are the pre-select group.
Firstly I had the idea to explore adding a textual piece to each photo, leaving the text open somewhat to interpretation. I experimented with this and later felt that it was better to leave the text out. I felt that the text was going to define too rigidly the meaning of the photo. It created a kind of quick look and move on feel, as now there is no need to lookat the photo.
Below an example of this test idea
There are two examples in the grid of images with and without text. The nun (back facing) and the beggar in the street. The other three images do not have text. Another technical decision I made was to format the aspect ratio to 16×9. This gave a little more intensity to the photos without loosing too much information in the frame. I felt that I needed to exclude some of the detail as it did not add to the image. A case in point is the beggar. In one photo you see to the left of the frame a lot of window pane. This I felt needed to go. The downside to the 16×9 format arose with the building photo as it seems to crop too much of the image from above and below, which in this case I am not sure is desirable. I later decided also to abandon this idea also and, apart from some mild cropping, have left the images as such in most cases.
The challenge that arose on the day of shooting was whether and when to ask permission or not when taking the photos. I discussed the ethics of this in the last assignment (assignment 2 research https://createatocalevel1photograph.wordpress.com/2016/09/27/research-assingment-2/) It was the case that on the first day I asked permission to do one shot, and was refused. This sets up an interesting dynamic on the street.
The issue then was one of timing and composition if the photos were to be clandestine. Some shots needed to be taken quickly and without fuss or heavy composing and shooting methods. So, the technique I employed was to compose as I came into the subject that I was photographing. I would spend some time just waiting and looking, trying to see what the overall context would look like and then what was going to be irrelevant to the photo (bearing in mind the theme of juxtaposition).
(note: 16×9 format abandoned on all photos)
Learning:
Two or three elements in a photo and one idea seem to be sufficient to create a work or series. I have tried to adhere to this in this assignment. In the foundation course, I remember being encouraged to ‘shoot the complex’ and not look for simple ready-made compositions. This seems to be a fine balance between shooting too complex a situation and loosing any emphasis visually or doing a set of perspective shots that anyone else with a camera can unwittingly take without any prior thought, concept or preparation. One of Bresson’s injunctions was to “not think whilstyou shoot”. However, his work was clearly informed by artistic visual training and he had developed this over a number of very many years. I can see the sense in not thinking whilst shooting if the discipline of study and visual awareness is already in place.
I have also been learning that my perception of a situation can change. My ability to compose has developed during this assignment and I find myself now, almost always in composition mode even when the camera is not with me. This has led to a kind of new seeing of situations that seems to be becoming more habitual in a positive sense.
5.Pre-select images and tests
16×9 aspect ratio
16×9 aspect ratio did not work with this photo as so part of why I decided not to use the format at all.
16×9 aspect ratio
6.Contact sheets for whole assignment
7.Where the assignment went next – follow on
Example of the 16×9 crop
At this stage of the assignment I had decided to ditch two ideas that were forming around the project. First, the use of text and secondly the use of 16×9 format. Both of these ideas seemed in the end to not fit in with the overall identity of these images. I have essentially pursued the theme of searching for juxtaposing situations and ambiguity in street photography. This has been much more of a challenge than I thought.
In this assignment I’ve chosen the theme of Crowds.
1.Feedback on assignment 2
Demonstration of technical and Visual Skills, Quality of Outcome, Demonstration of Creativity “It is really to good to see the research section prior to the assignment. Providing your references for the research is excellent practice – and do continue to do this.”
“You have applied several interesting techniques to this assignment. Firstly the square crop as a technical decision – quite rightly you have applied this to all the images. Within social media with the rise of Instagram the square crop has become much more familiar as an image format. It also has the advantage of forming a grid of images very easily – in order to display this better, reduce the images to 9 to allow for a 3 x 3 grid. Possibly remove no. 5 as it is similar to no. 8.”
Yes this I decided to do in order to minimise extraneous objects from the photos. As I say in the evaluation, initially I was not comfortable with the square crop but later it seemed the right decision to make for this particular theme.
“Secondly the idea of following one person gives a really good structure to the piece and allows for it to become a series rather than a selection of random images. It would be good to get some feedback from people, who are not initially aware that it is the same person in each image to see if you can spot them. The problem with knowing from the outset it that you start looking as if searching a ‘Where’s Wally’ drawing. As you have realized it is better to isolate within the crowd rather than try to photograph a whole crowd.”
The influence of Sophie Calle here, made me decide to follow one person, but within a crowd. I wanted to define more the project and not produce just a generic batch of photos of crowds.
coursework
“Demonstration of technical and Visual Skills, Demonstration of Creativity. You are completing the exercises/projects and uploading your work. Continue to do this. It is clear that you are able to take well composed images from the selection presented for Part 2 of the course.”
Research “Context, reflective thinking, critical thinking, analysis It is good to see that you are undertaking reading alongside the course. The section on your log is expanding. Do keep adding to this as you research more. Your comments are giving an insight into what you have gained from the book or exhibition. Try to expand on these further. For example with the William Eggleston exhibition, was there an image that really stood out for you? If so describe it. You may use a small notebook to make notes on in galleries, and then photograph the pages and upload them later.”
Learning Log “Context, reflective thinking, critical thinking, analysis You have uploaded pages of your learning log as photos – which is a way of showing a log that is written. Can you look at the settings within WordPress so that when you click on a picture it goes full screen. It would be really good to be able to read what is said on the pages without having to zoom in on the web browser. You are working through the exercises and commenting generally on your work. The next stage is to start reflecting more on your progress. This self-reflection does come with time. Think about what you have gained from completing something? Maybe it was a technical or artistic consideration that you were already aware of but had forgotten about? How can you improve your work?”
“The notes in your handwritten log are showing good review of your work. Continue to do this and expand the detail of your comments as detailed above.”
Suggested reading/viewing Context Include more analysis in learning log.
“For looking at isolated figures you may like the work of Vivian Maier – an American photographer whose work recently come to light.”
“For looking at how to photograph amongst a crowd do look at Weegee – another American whose new photographs featured crime scenes. He was able to position himself in order to capture the scene or the onlookers in a very successful way. If you are not familiar with Weegee then this audio clip is well worth listening to:”
Pointers for the next assignment / assessment “Develop further your critical analysis comments on your own work and the work of others. There are study guides available on the OCA Student Site – if you need help finding them do let me know.” “Before assessment I would see if you can get some feedback from people who are not aware of the concept behind the work to see if they can spot the figure and how long it takes.” “Keep adding the research section of the blog and written learning log. Remember what you look at doesn’t have to be directly related to the topics you are completing or assignment.”
2.Brief:
Create a series of between six and ten photographs from one of the following options, or a subject of your own choosing:
Crowds
Views
Heads
In the research section of the blog you will see more explanation on the theme crowds. Here I follow the assignment notes:
Explanation of subject.
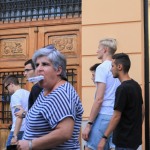
Crowds are an interesting phenomena, both curious to observe and frustrating to photograph as they tend to move. I have chosen to focus the project on a crowd that was moving; essentially a group of tourists on the move through the city. The main inspiration for the way the project has been carried out is from Sophie Calle’s work ‘Suit Venitienne’. (1979)
Sophie Calle’s work has nothing to do explicitly with crowds. The element I have drawn from her work was the theme of pursing an unknown person through the streets. I did this with one person in the crowd, deciding to give the crowd , which is normally an impersonal subject, a more personal feel.
In ten pictures I worked to incorporate the same figure into ten different crowed based appearances. The theme in general served well to reflect on the nature of crowds as personal and impersonal. Personal in the sense of a subjective experience; viewing or being a part of the crowd or group and impersonal from the point of view being without reference to a particular person. Therefore I have tried to display the impersonal and personal together.
I attempted to use many of the methods from part 2 in this assignment to see how they would hang together and tell a story.
4.Contact sheets for the shoot
Pre-select images
Selects for the assignment
A word about the format
For this assignment I shot the images in horizontal format but later decided to crop all the images to the aspect ratio 1×1. At first I had misgivings about this as I thought that in order to see a crowd one should really use a large wide format as possible to show the multitude. But as my idea shifted to one of pursuing an individual, in an attempt to bring in a personal element to an otherwise impersonal crowd I decided to use the 1×1 format. Rightly or wrongly I have stuck with this decision.
5.The assignment selects
Originally there were 10 images in the series but I have removed one (was number 5) due its similarity to photo 8. This was suggested by my tutor.
Photo 1.
All images shot at 100 ISO on AV mode.
85mm f/3.2 1/250 sec
First image. A line (suggested) could be drawn through the ears of the three people and would give a diagonal from corner to corner of the frame. However, I was mainly aiming to show foreground, mid-ground, background and different heights of the figures placing the protagonist in the middle. The angle of view that I took was lower than the subject to show height.
Photo 2.
85mm f/2.5 1/640 sec
Here it may have been better to of taken the shot closer so as to make him more figurative and even less in focus. Background thrown out of focus, the camera slightly angled for a contrasted effect with the tilt of the man’s head.
photo 3.
28mm f/2.8 1/640 sec
Here the idea was to show the crowd in transition. Visually the first point of focus is the man’s face and second point of focus that of the woman in front. The angle is view is low to draw attention to the height of the figure.
photo 4.
85mm f/8 1/30
This image falls below standard on sharpness. I would have like to of re-shot with more focus. The aim is to juxtapose the near and far elements such as the woman’s head and then the main character.
Photo 5.
28mm f/2.8 1/800
Interacting with the man, is another face. The main focal point is the other man. By reference the main character brought into focus, talking with his friend. The second point of focus is the main persons head, although the back of it.
Photo 6.
28mm f/2.8 1/500
The angle of view is as it were normal at head height here. I used it to show the height difference between the two people. At f/2.8 the background is mildly out of focus so as to keep the main attention on the two figures in the front of the photo.
Photo 7.
85mm f/8 1/30 sec
Again whilst not an image with strong focal points, I wanted to maintain the theme of the height of the protagonist in relation to other people. He is more into the corner of the frame here, almost serving as a point. How this interacts with the rest of the picture is by being a focal point within the group, several people having spotted him in the background of the picture. 85mm f/8 for greater depth of field.
Photo 8.
28mm f/2.8 1/1600
The perspective of view is low. I chose the angle of view in relation to the flag poles. Tallness, overpowering and imposing were the themes. The photo has failings. There were clipped highlights and I had to reduce them heavily.
Photo 9.
28mm f/2.8 1/640
The culmination of the series with the protagonist being the archetypal tourist. I used the opportunity to shoot with wide-angle in order to broaden the mid and background with horizontal lines drawing out.
Another viewing format that I set up, as it aids for a different experience in seeing the photos as a series.
Rejected images from the initial sequence:
These images do not fit in with the overall flow of the series.
6.Evaluation
What worked well was the flow of the theme. Pursing a stranger to make a crowd less anonymous and personalise the impersonal. I think the idea fits. What has not worked so well is the challenge as a series. I think it might be improved by having some images that juxtapose a little more; that are of the same theme but different subjects. As it is I tried to achieve both of these things within this set of images but I think it lacks variety. I might have included some similar objects that depict crowds, but not people. Such as a crowded fruit bowl, a crowed fridge. This may have impacted more the theme of crowds.
Added April 2017
Evaluation changed to include the following comments:
On further reflection I realised that I am pleased with this series of photos. ‘Following my nose’ I felt that pursuing a stranger (one person in the crowd) did work well as a concept and I think that it has produced a coherent set of images. This reflection has come about in retrospect from following the rest of the course to assignment 5.
The majority of the shots are take at a relatively close range. I made the conscious decision to exclude excessive activity in the surrounding scene so that I could make it visually clearer that this figure is the same figure. I received a comment on the work from a fellow student that confirmed that this aspect of the series made it interesting especially seeing the different expressions of the face of the same person.
The square crop (the second time that I had used it for the assignments in this course) was not something that I was initially comfortable with. It seemed initially to compromise the bigger setting of the picture. Here I learned something about selection and decision making as to what to include and exclude from the frame.
Exercise 2.3 (close view point from below) fed into this assignment and I think had more of an influence in the way that I decided to shoot it than I originally realised.
From what I’ve learned now from assignment 3 I would re-shoot with a different focal length. The photos that I took with an 85mm lens I would still shoot but those of 28mm I would change to 35mm. For the last shot of the scene, I wanted to exaggerate the vertical lines thus here I would stick to the 28mm lens.
Initial thoughts and first impressions on the square mile.
‘A story of life and death’
Contents:
Tutor feedback
Introduction
Contact sheets
Examples and tests
Photographers that influenced the assignments
Technical approach to assignment
The assignment photos and ssessment of photos (strengths and weaknesses)
Evaluation of the assignment (with up-date)
Tutor feedback assignment 1
Demonstration of technical and Visual Skills, Quality of Outcome, Demonstration of Creativity.
“For the assignment you have given good detail on your planning and research. In addition you have explained your methodology for assignment.”
“For each image you have outlined the strengths and this shows a good engagement in your work. Without sounding negative you may wish to outline the opposite side to this – whether you use the term ‘weaknesses’ or find an alternative word is up to you. This is not to tear the image apart but to pick out on elements that could be improved (sometimes these are beyond your control). Using diagrams to explain the image may also be useful here.”
“In your conclusion you discuss you work in the abstract – again you could expand here and give more details on specific areas to work on. These could be technical elements or more artistic approaches to your photography.”
I have added to the evaluation/assessment at the bottom of the page some more notes
“You have produced a clear set of images that function as a series. It is clear that you have bought knowledge from the foundation course to this assignment, which is excellent.”
“The resulting images work well to pull the reader into seeing them as a distinct series. You have approached the theme from an abstract approach and then used your research and reflection to explain this approach.”
“Whilst the structure of this report is not to dwell on technical aspects, there are a few points that I will make on some of the images.”
2- highlights are bright and verging on burning out 3 – excellent capture of the movement with the lines of shadow through the boy’s head 4 – artistically seems different from the rest of the series, has a different tonal range 5 – abstract and strong street photograph – it echoes Cartier-Bresson 7 – when viewed on the screen the bicycle does not seem quite sharp 10 – a very strong image, despite having lots of highlights the detail is just kept in them 11 – image is quite bright against the rest of the set. Reminiscent of Robert Adams images (see example below).
Coursework Demonstration of technical and Visual Skills, Demonstration of Creativity “Your coursework is being well document on the log. For exercise 1.2 it is good how you have drawn on the images to explain the exercise. This is a good technique when analyzing images as often a diagrammatic approach can be much more succinct at explaining as compared to a written post.”
Research Context, reflective thinking, critical thinking, analysis “You are showing good research in your learning log. Do keep adding to this section of your log as you progress through the course.”
Learning Log “Context, reflective thinking, critical thinking, analysis Your log section on the blog is most interesting reading with the images from your physical notebook. It is often illuminating to read rough notes and accompanying sketches and your pages are no exception here.”
“The blog is clearly sectioned and easy to navigate to each of the tabs. However you may wish to look at how you can index within each tabbed section, as currently you have to scroll through the whole section to view a particular exercise or post.”
Suggested reading/viewing Context Robert Adams – black and white images from the New Topographic movement You can compare the work of Adams and his contemporaries to the German Dusseldorf School photographers such as Becher, Gursky, Struth and Ruff.
2. Introduction
In this page I present the working out of the actual photo sequence. For details about research and reflection in preparation for the assignment go to the relevant section from the home page.
I have worked through a few ideas that are in some way thematically related. I have to say, that for me my interest leans very much towards the symbolic or even metaphysical in photography, in the sense of seeing something of a deeper meaning to our connection with the world we live in. So, the brief of the square mile has turned from ideas of change and impermanence to life and death. I have been grappling with these ideas for years, way before the advent of my photography career. Finally, I have found a mode of expression (photography) for these ideas or perhaps, insights is a more accurate way of describing it. Portraying these insights through an image is undoubtably a challenging thing to do.
So what I aim to show through these photos is more the nature of what I see within the conditions that I live in, or rather, what is most prominent for me in the environment and what sort of reflections are activated. The reflections that are often activated for me in my life are those around the ephemeral nature of society and precariousness of the human condition. How, societies and ideas come and go. How times change leaving an indelible mark on the landscape. As I am a foreign visitor often to a fascinating landscape (The Iberian Peninsula) I often use this place for my projects and assignments. I am British but have strong links to Spain. So my perspective is that of a foreigner but my images hopefully touch on something universal. I am photographing in a foreign land but using my cultural training and conditioning to compose the images.
The development of idea number three so far has brought me to the theme: Square mile, a story of life and death. In this instance I’d like to portray through the images a coherent presentation of 10 – 12 images that show my relationship to the place where I stay as a journey or narrative which ‘talks about’ life and death. That could be actual death of the organism or metaphorical death, such as the moving or changing of circumstances or the ending of something; which death always implies. Life is what goes on in the everyday, often happening to us without much reflection or observation. In the smaller details we see things that we did not see before. Awareness is the key player for this photographic series, awareness of the immediate surroundings, but more as metaphor rather than literal. I wanted to steer away from literalism and try to approach the images via a more reflective and suggestive manner.
In my written blog I have put some additional notes about the process of preparing for this assignment. Here I write an outline only.
Beneath are the first set of contact sheets that I have used and made some of my selection from.
3. Contact sheets
Contact sheet 2contact sheet 14. Examples and tests
Examples of images that I have reworked after initial shooting to improve the aspect ratio.
Images below (Example 1.) show how I adapted the regular framing to square framing of the subject. I used the square crop throughout the assignment to be consistent and to give the set of photos greater impact by focusing on less detail. There is one case where I have used a non square crop as the photo was shot because it would have drastically altered the composition if I had of done so by cropping it to a square aspect ratio.
Example 1.
Below (Example 2.) and example of one of the images from the series that I experimented with. I took the original framing and cropped it square. I had several issues with doing this although largely I wanted to have the sequence as a square crop for coherence. I thought on balance the colour image had more visual impact but the composition of the square crop more compositional impact. There were a few images that worked better in colour and I think that this is one of them.
These photos later not used in final selection
Again with example three I have chosen a square crop image instead of the (in this case) portrait crop. The portrait frame for this image does to do so well in showing the backdrop where the graffiti can be seen this it looses visual credibility.
Example 3.
Below another example (4.) of cropping but not to square. This is one of the two images in the series that I did not crop to square because the images were not going to be served by a square crop this in fact it would have been counter productive to use it. However, here I did want to exclude (after some thought) some of the foreground and one of the people to the right of the frame in order to draw the focus in.
Example 4.
These images were later not used
Here I present another example (5) of an image which I adapted through cropping to 1×1. Here are three different exposures. I Also adjusted the shadow and highlights. The picture was originally heavily contrasted between highlights in the background and the foreground in shadow. The fault of the image is that it has a strange caste over the boy’s body and face. As a composition it has a central focus which is that of the boy. The setting is the street and the style of the image is vernacular mixed with documentary. I chose the setting for the background which is plain and the foreground which was plain also. The idea here was to draw the focus to the person. The second focal point is the door to the other side of the frame which offers to balance the picture somewhat. The shadow lines moving from the boy’s head to the door offer a connection to the two parts of the image. The other fault of the image is the grid coming from behind the boy’s head which distracts the eye to some degree. Having been given license to use it for this assignment I might have photoshopped it away. Generally it is a good idea when including people or portraits to not have the head obstructed by other phenomena. I chose the central photo of the three. The first was too washed out with highlights and the last too dark which did not allow seeing the boy’s face.
Example 5.
Let life move through you…
Final edit used below
This is the final image used for this sequence after increasing again the exposure.
Let life move through you…
5. Practitioners explored that influenced this assignment
The practitioners that I explored can be found on the research page under assignment 1. Two of the most prominent influences have been Robert Capa and William Eggleston. Both of these photographers excelled in their capacity to take images that were of the environment in such a way you feel that the photographer was not there.
They were both taking pictures in places that they knew very well, although Eggleston was definitely more rooted in his environment whereas Capa was more of a nomadic photographer travelling in foreign lands. Capa photographed and was famous for his work in war zones (especially the Spanish civil war) Eggleston was more of a contemplative of his environment taking what almost appears to be, vernacular photos of his surroundings.
(Capa,R.1939) SPAIN. Spanish Civil War (1936-9). Barcelona. January, 1939. The Spanish Civil War broke out in 1936, when part of the Spanish army rebelled against the Second Republic, a democratic government elected in 1931. It gained international dimensions when Fascist Germany and Italy began supporting the military uprising, led by General Franco, with weapons and soldiers. The USSR helped the Republic, and a significant contingent of volunteers joined the International Brigades and fought for the Republic. The conflict became the symbol of a larger conflict between Fascists and Communists. The war ended in 1939 with Franco’s victory over the Republicans. Running for shelter during the air raid alarm. The city was being heavily bombed by Fascist planes, as General Franco’s troops rapidly approached the city.(Capa,R.1937) SPAIN. Bilbao. May 1937. Crowds running for shelter as the air-raid alarm sounds.
6.Technical approach to the assignment
For the large part of the assignment I use a 28mm fixed focal length lens and at times resort to a 85mm fixed focal length to gain greater magnification of some of the elements of the photos taken. I decided to convert all the images to black and white. In fact they were taken in black and white in the camera, for the most part. All the files were shot in RAW format and in manual mode from the camera.
In one image I panned the photo (cyclist) to add a dimension of movement to the series so as to enhance the theme of ‘life’ which is part of the idea behind the assignment. I did not want to produce an overly melancholy sequence of images and so I aimed to balance the dynamic with the static. For this reason I have several images of people moving, in the first part of the series which depicts life.
7.Assessing strengths and weaknesses of my photos
Below I give an outline of the main images in the series:
These images are not in the sequence presented for final showing.
1- Strengths: Strong lines intersecting and a visual pattern to the stone wall. The man walking out of the frame offers a key focal point although the sense is that it is a little too distant to feed much into the image.(weakness) He is slightly outside of the more visually stronger point of the upper third.
2-Strengths: The image really only has a single focal point which is the pane of glass which is broken. The key adds an interesting dimension that maybe could lead to a question in the photo. The image shows detail and leads the viewer straight in without ambiguous detail. Weakness: lacks a more contextual background to tell a story as to where this is taking place. However I was as the brief stated paying attention more to the flow of the series not too much any one photo.
3-Strengths: Clear focal points; the boy looks straight into the frame of the camera and this offers a certain engagement for the viewer. The photo again has few focal points, the door, the bench and the boys posture. (weakness) Maybe too simple and not enough detail. The background slightly disturbs the viewing with the grill protruding from his head.
4-Strengths: Visually interesting and the wood propping the bed the bed up offers a diagonal line that contrasts the otherwise vertical and horizontal lines. (weakness) Shallow depth of field, maybe of use to have shown more of the background to juxtapose inside with outside and a deeper D.O.P.
5-Strengths: I dynamic feel to the photos with the girl with the bread clearly blurred in the slower shutter speed. This was intentional although as with most of these shots they were not staged and arranged in the street as people happened to be there. I believe the photo depicts fairly well the theme of life, as in everyday life, buying bread, a daily activity that in some ways portrays well a scene of Spanish daily existence in villages.
Weakness: I would of like the full head to of been into the frame so that it could of added more punch to the picture. As it is it seems as if the picture lacks fully what it could of offered through that detail.
6-Strengths: This is the first image in the sequence and the idea has been to begin and end with doors so as to tell a tale through narrative. The door opening is opening the story of life and death. (weakness) The image lack in itself interesting focal points although perhaps will trigger a question.
7-Strengths: The final image in the sequence to close the story. I think the image has clear focal points around the chain. It only makes sense int he context of the narrative, having seen the other photos. (weakness) In itself it would appear to be showing banal detail of a door that is closed but the intention has been to finish the story with some coherence in image to how the story began.
8-Strengths: The balls in the otherwise empty pool lead the eye along diagonally and then into the background to show some of the environment of the square mile. The reflection gives the image a certain depth. (Weakness) I would say here is what is happening near the top of the frame into the sky. There is some space that is white, and it does not add to the frame. It could of been composed lower down to avoid that perspective.
Final selection and arrangement of images in slide show format and stills beneath
NOTE: The images should be viewed from the order of the open door, to the closed-door.
This slideshow requires JavaScript.
Stills for the assignment below
A story of life and death
Climb
Let life move through you
speed junkies
Daily bread
Shape and form
Abandonment 1
Game over
what used to be…
What could have been…
We played there
Did you see it?
8.Self assessment and conclusion based upon assignment 1
On the whole I am pleased with the outcome of this assignment. It has drawn out at least for the moment, the way I think that I envision to some extent my environment. I would say that I have demonstrated reasonable technical skill and visual awareness in terms of composition and design of the photos.
As for being inventive and imaginative, I have tried to work with these two principles. I have to admit I did not find the brief that easy in some ways as one could interpret it in so many different ways. But what I have tried to do is steer away from a random depicting of my environment. Instead I have worked to explore the environment from the point of view of how I experience it in a more as it were, existential sense.
I did some basic research for the project including looking up the mentioned photographers and as well as broadening that to include three others: Robert Capa, Robert Franklin and William Eggleston. All of these photographers offered some inspiration and direction for the series done in this assignment. Most of all Capa and Eggleston.
Added to assessment self evaluation April 2017
I need to flesh out more some aspects of the assessment and give a bit more detail.
I used an abstract theme for this assignment to push myself and try to create a more symbolic or figurative relationship to life and death, in this particular place. I used black and white to draw a focus more into the shapes and forms of the pictures and to create a less colour charged imagery. In presenting for example, broken glass with a key, I here wanted to close the framing in in order to make a special feature of the broken element. The glass and the abandoned door, the atmosphere of abandonment for me represent ‘death’ in a symbolic way. That all things have their time. Really what I had in mind, was using such symbols to represent human death and transition. I worked here to show the juxtaposition between ‘life’ and ‘death’. Life being represented by movement, youth and people going about their lives. Death, the ending of scenarios, habitats, places where people once dwelt and broken or abandoned objects.
I decided after looking closely that the square crop was definitely the most suited aspect ratio for this series. I seem to prefer the use of detailed imagery as opposed to large wide frames that include many different elements. However, I also think that, as way mentioned in the foundation course, that learning to shoot the complex is important in order to learn.
How could this project be developed in the future?
In retrospect I would have liked to have focused more on portraits of people to illustrate the relationship I have with the place that I find myself. Coming back to idea two which can be seen in the log section, I would say that I could base the theme of life and death more around the lives of people in their situations. This might take the project into the domain of intimate photography observing the lives of some of the people who I know and their day to-day existence. This could be worked into a project that would perhaps highlight more how the theme of life and death is something close at hand all of the time. Using the more symbolic motifs might help as poetic enhancement of the theme.